If you're following the Artsy Addicts Blog hop you arrived at this page from
Chic Scrapbook Designs by Limor Webber and after reading this blog your next step in the hop is
The Best Day of My Life . (It seems that The Best Day of My Life blog wasn't having the best day and didn't add a blog today so here's the next link
Miss Danielle Renee . I hope you enjoy your hop here-don't forget to leave a comment to be entered in a drawing for today's project.
Today brings me to my first blog hop-one for the Artsy Addicts group on Facebook. Today's hop is all about teaching one of your favorite techniques. One of my favorites and one of the easiest is Faux Leather. This technique is so simple although it does take a little planning as it does take a while to dry-to speed up drying you can iron or use your heat gun but I usually just make the Faux Leather a day or so before I want to use it.
Faux Leather is super easy to make and takes only a few basic supplies that most artsy ladies and gents will have in their stash!
|
| For this technique you will need Ranger's Perfect Refresher solution, cardstock (colors of your choice) and stamp/distress pads (again colors of your choice) and paint or gesso (optional). You can also use an Iron or Heat Gun (I will explain this later). |
|
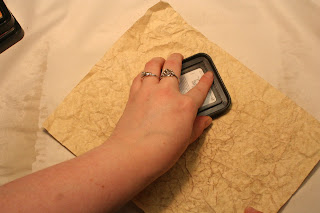
| Saturate the front and back of the cardstock with Perfect Refresher solution |
|
| Rub solution over paper to coat completely, this will soften the paper and give it an oily feel. |
|
| Crumple and uncrumple the cardstock until you get the amount of wrinkles you want (experiment with less or more). Each piece will turn out different. Using the same colors on multiple pieces of paper will make them similar and coordinate but no two pieces are exactly alike. |
|
| When you have all the wrinkles in the cardstock you want completely uncrumple the paper and lay flat on a covered surface. |
 |
Using ink pads or dry brushing on paint, apply color to the cardstock, starting with the lightest colors first and adding as few or as many colors as you desire. Here I used the Distress ink pad in Milled Lavender |
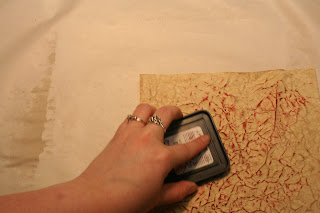 |
Second I added Aged Mahogany |
|
| And finally Vintage Photo. |
If you want your cardstock to be smooth you can iron it using a craft iron or regular household iron. To speed drying, or if you used a pigment ink you can use a heat gun to set the ink. I usually just leave mine on a flat surface to "cure" for 24 hours or so because I like the bumpy texture of not ironing it.
|
| Several other pieces of "Faux Leather" I made. |
And now a few pics of the project I made from my "Faux Leather" paper.
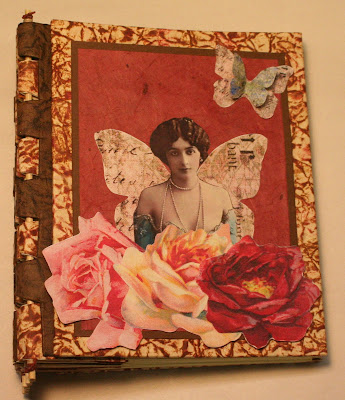 |
| Cover of a Piano Hinged book made with "Faux Leather" paper |
Pictures of the first page of each signature
Thanks for stopping by for my first blog hop. I hope you enjoyed yourself, I certainly had fun working on it. Don't forget to continue on in your hop with
The Best Day of My Life . A huge Thank You to
Angee Lee Butler and
Marion Smith for organizing this hop!


Awesome job Dawn! I have to get some more coffee in me so I can hop along here. I haven't made it past morning FB. :)
ReplyDeleteYeah! Good job! I love how this technique works in real life.
ReplyDeleteLove this technique! TFS!
ReplyDeleteThis would be perfect for a guy's card!
ReplyDeleteHey girl! showing an artsy Addicts sister some Love! Great tutorial!!! hugs!!!
ReplyDeleteLimor
I super love this ... it looks very elegant and diffrent.. thank you for sharing :)
ReplyDeleteGreat technique!
ReplyDeleteThis is lovely! Did you hand-make your book binding, too! I'm really wanting to get into that!
ReplyDeleteVery cute and vintage. Thanks for sharing!
ReplyDeleteThanks Kelly-yes the binding is hand-made and very easy if you want me to email you the instructions let me know-my contact info is at the top left of this page
ReplyDeleteso pretty vintage feel love it
ReplyDeletePeggy Lee
http://pegbaker.blogspot.com
Love this technique! TFS!
ReplyDeleteOkay gotta try this one too so talented you people
ReplyDeleteAMAZING... Dawn what a wonderful way to create a leather look. I love how you've used like book binding... so clever. Thank you for sharing this with us.
ReplyDeletehugs
Darlene
Thanks for sharing I'm hoppin' on through and havin' fun doing it, feel like a bunny! woohoo! Kelly (walkelmol on yt)
ReplyDeleteThanks for sharing! Everyone is so talented!
ReplyDeleteOh' I just loved this... great job! Blessings,
ReplyDeleteLisa
Really like how you used this technique in your album,thanks for sharing that, Julia.
ReplyDeletewww.straydreamsblog.blogspot.com
TFS. love this technique.
ReplyDeleteAbsolutely wonder technique demo. I will definitely try this out soon.
ReplyDeleteVery cool technique, tfs...Hugz, KimScrapper
ReplyDeletevery cool
ReplyDeletebeautiful!!!! TFS!!!!!!!
ReplyDeleteGreat tutorial! Thanks for sharing :)
ReplyDelete